How to Create an Event
EventHex uses a three-step wizard to create events. You will configure Basic details, Tickets, and Modules before publishing.
Open the Wizard
Section titled “Open the Wizard”- Log in to the EventHex Portal.
- Go to Events in the left sidebar.
- Click + Create Event in the top-right corner.
The Add Event modal opens on Step 1 — Basic.
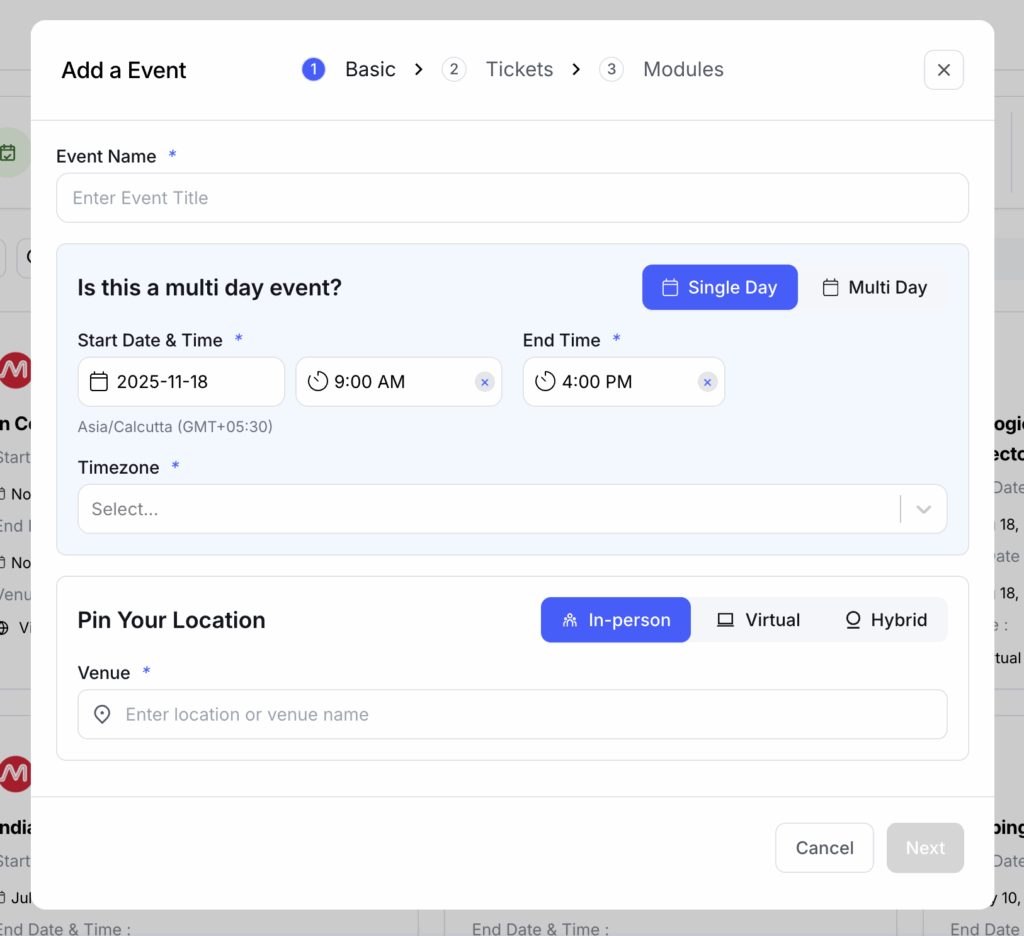
Step 1 — Basic
Section titled “Step 1 — Basic”This step captures the core event information: name, dates, timezone, and location.
Creating Event For
Section titled “Creating Event For”If your account manages multiple organizations, select the organization this event belongs to from the Creating Event for dropdown. Single-organization accounts skip this field.
Create with AI
Section titled “Create with AI”Click the Create with AI banner to auto-generate event details from a prompt. This is optional — you can fill every field manually instead.
Event Name Required
Section titled “Event Name ”Enter a clear, recognizable name for your event.
| Good Examples | Avoid |
|---|---|
| Annual Tech Innovation Summit 2026 | Tech Event |
| Dubai Marketing Workshop — Spring Series | Workshop |
| International Healthcare Conference | Conference #4 |
Single Day / Multi-Day Toggle
Section titled “Single Day / Multi-Day Toggle”Use the toggle at the top-right of the date section to switch between a single-day and multi-day event. The date fields adjust automatically:
- Single Day — you pick one date, then choose start and end times.
- Multi-Day — you pick separate start and end dates, each with its own time.
Start Date & Time Required
Section titled “Start Date & Time ”Click the date field to open a calendar picker, then select the time. Times use a 12-hour format with AM/PM.
End Date / Time Required
Section titled “End Date / Time ”For single-day events, only the end time is shown (same date is implied). For multi-day events, a full date-and-time picker appears.
Timezone
Section titled “Timezone”The timezone auto-detects from your browser. To change it, click the timezone label and search by city or offset (e.g. “Dubai”, “New York”, “GMT+4”).
Event Type
Section titled “Event Type”Choose the format that matches your event:
Venue field appears (required). Start typing an address or venue name — EventHex uses Google Places autocomplete to suggest locations.
Best for: conferences, trade shows, workshops, and networking events at a physical location.
URL field appears. Paste your meeting link (Zoom, Google Meet, Microsoft Teams, Webex, or any custom URL).
Best for: webinars, online conferences, and remote workshops.
Both Venue and URL fields appear. Fill in the physical address and the virtual meeting link.
Best for: events that offer both in-person and online attendance options.
Completing Step 1
Section titled “Completing Step 1”Once all required fields are filled, click Next to proceed to Step 2 — Tickets.
Step 2 — Tickets
Section titled “Step 2 — Tickets”This step defines how attendees register and what ticket types are available.
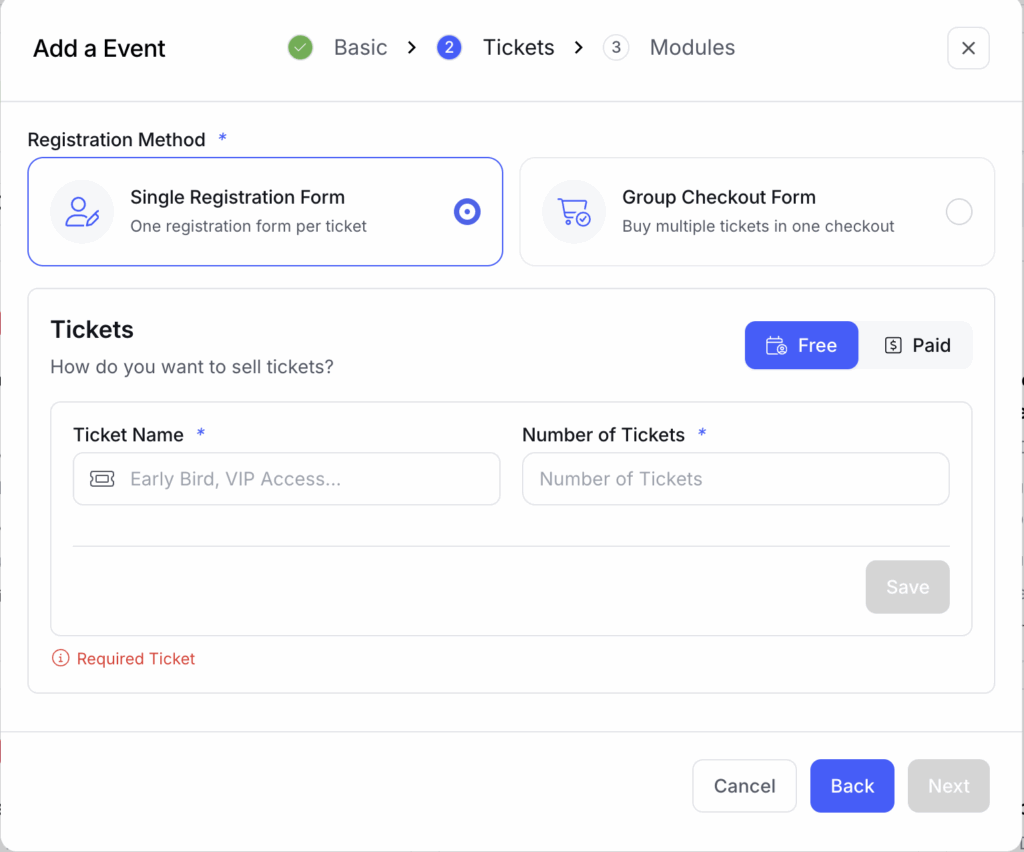
Registration Method
Section titled “Registration Method”Choose how the registration form works at checkout:
| Method | Behavior | Best For |
|---|---|---|
| Single | One form per ticket — each attendee registers individually | Events with distinct ticket tiers needing different info |
| Multiple (Group) | One checkout for multiple tickets — streamlined bulk purchase | Corporate bookings, family events, team workshops |
Name Field Mode
Section titled “Name Field Mode”Decide how attendee names are collected:
- Split — separate First Name and Last Name fields.
- Single — one combined Full Name field.
Ticket Type
Section titled “Ticket Type”No payment is required. The registration form collects attendee details only.
Best for: community meetups, internal events, webinars, and open-door conferences.
A Currency dropdown appears. Select your currency (USD, EUR, AED, INR, GBP, etc.), then set individual ticket prices below.
A payment gateway must be connected before attendees can complete paid registrations. See Payment Gateway Integration for setup instructions.
Adding Tickets Min 1 required
Section titled “Adding Tickets ”Every event needs at least one ticket. You can add up to 10 ticket types.
- Click Add Ticket.
- Enter the Ticket Name (e.g. “General Admission”, “VIP Pass”, “Early Bird”).
- Enter the Quantity — total number of tickets available for this type.
- For paid events, a Price field appears — enter the amount in your selected currency.
- Click Save to add the ticket.
Saved tickets appear in a list. You can edit (pencil icon) or delete (trash icon) any ticket.
Ticket Strategy Tips
Section titled “Ticket Strategy Tips”| Strategy | Example |
|---|---|
| Early Bird pricing | ”Early Bird — 200 qty @ $99” then “Standard — 300 qty @ $149” |
| Tiered access | ”General Admission” + “VIP All-Access Pass” + “Workshop Add-On” |
| Student / Group rates | ”Student Discount — 100 qty @ $49”, “Team Bundle (5 pax) — 20 qty @ $299” |
Attendee Info Collection
Section titled “Attendee Info Collection”Optionally choose whether to collect information from:
- Buyer only — only the person purchasing fills in details.
- Buyer and each attendee — every ticket holder provides their own info.
Completing Step 2
Section titled “Completing Step 2”Click Next to move to Step 3 — Modules.
Step 3 — Modules
Section titled “Step 3 — Modules”The final step handles event branding and optional feature modules.
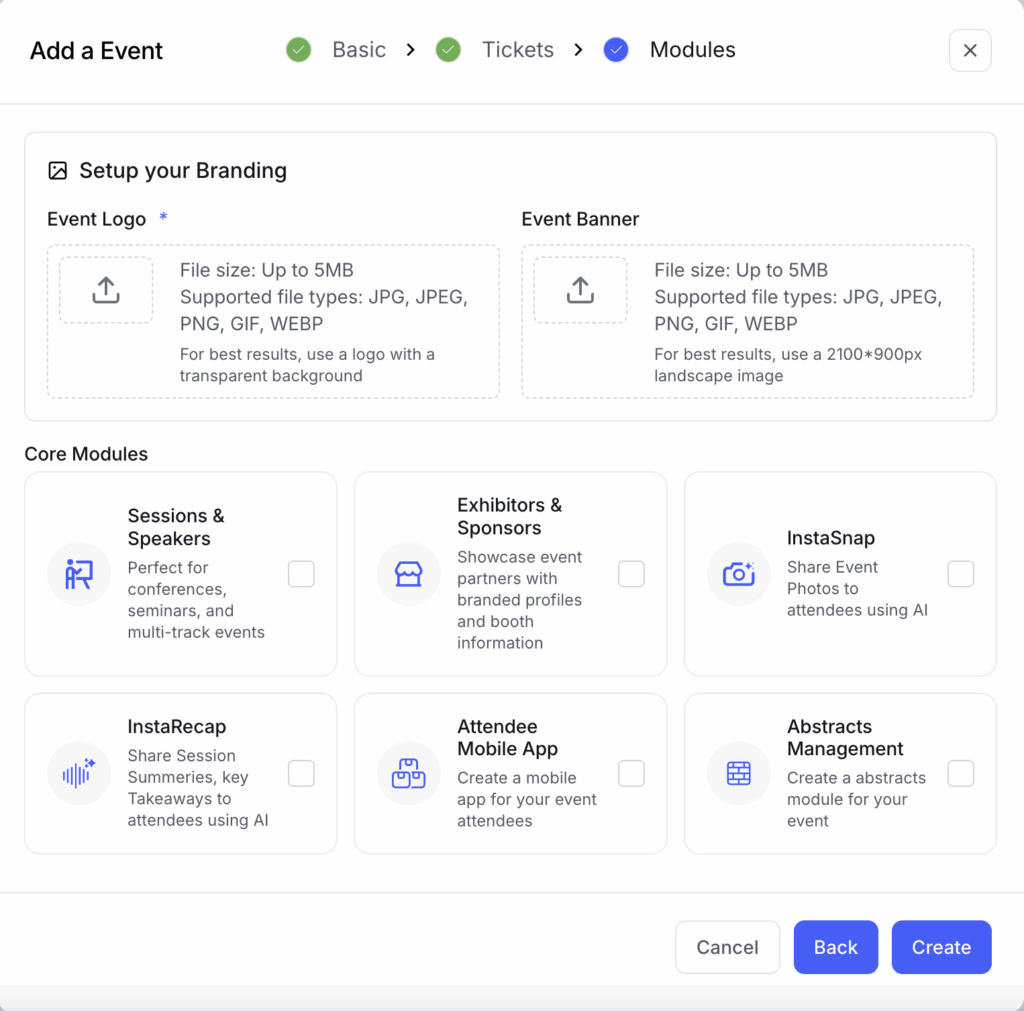
Event Logo Required
Section titled “Event Logo ”Your logo appears on the event page, registration emails, badges, and the mobile app.
- Max size: 5 MB
- Formats: JPG, JPEG, PNG, GIF, WEBP
- Recommendation: use a logo with a transparent background for best results
Event Banner
Section titled “Event Banner”An optional banner image displayed at the top of your event page.
- Max size: 5 MB
- Formats: JPG, JPEG, PNG, GIF, WEBP
- Recommended dimensions: 850 × 350 px (landscape)
Event Languages
Section titled “Event Languages”Toggle Enable Event Languages to make your event multilingual. Select from available languages (e.g. English, Arabic, German). The default language is marked automatically.
When enabled, multi-language fields (Event Name, Venue, Ticket Names) accept translations in each selected language.
Core Modules
Section titled “Core Modules”Toggle on the modules your event needs. You can enable or disable these at any time after event creation.
| Module | Description |
|---|---|
| Sessions & Speakers | Build agendas, manage speaker profiles, organize multi-track schedules |
| Exhibitors & Sponsors | Showcase partners with branded profiles, booth numbers, and sponsor tiers |
| AI Gallery (InstaSnap) | AI-powered photo distribution — automatically matches and shares event photos with attendees |
| InstaRecap | AI-generated session summaries and key takeaways delivered to attendees |
| Attendee Mobile App | Branded mobile app with push notifications, live agenda, and in-app networking |
| Abstracts Management | Call for papers workflow — submission, peer review, and author communication |
Publish the Event
Section titled “Publish the Event”Once the logo is uploaded and you are satisfied with your module selection, click Create. Your event is now live in the EventHex portal.
Your Event Website Is Live
Section titled “Your Event Website Is Live”As soon as you click Create, EventHex automatically generates a public event website for your event. Attendees can visit this website to:
- View event details, dates, and venue information
- Browse speakers, sessions, and sponsors (once you add them)
- Register for tickets and complete payment
- Access the AI Photo Gallery, InstaRecap, and mobile app (if enabled)
Your event website URL follows this pattern:
https://your-org.eventhex.ai/your-event-slugSee Event Website — The Attendee Experience for a full walkthrough of what attendees see on the website.
What to Do Next
Section titled “What to Do Next”- Website Design — configure your event website pages and layout.
- Tickets — fine-tune ticket settings, add more types, or configure advanced pricing.
- Form Builder — customize the registration form with additional fields and questions.
- Sessions — build your agenda and add speaker profiles.
- Photos — set up AI Gallery for automatic photo distribution.